Setting up Glossaries
Glossaries are Yaml files that contain lists of terms, their definitions and other attributes. You can have as many glossary files as you like.
The first part of this page will explain the high level structure of a glossary file.
The second part will explain how to setup to find your glossary files so that the right terminology is available at the right time.
Creating Glossary Files
The header of a glossary file defines the context within which the terminology in the file is well defined.
In Contextive, the context is an important concept (it’s in the name!) and is inspired by the Bounded Context from the field of Domain-Driven Design.
Bounded Contexts
In Domain-Driven Design, a Bounded Context is a logical boundary around a model of some portion of the domain.
Within a Bounded Context, terminology should be precisely defined, but a definition in one Bounded Context is unrelated to definitions in other Bounded Contexts - the same term may have two very different definitions in two different Bounded Contexts.
It’s quite common for different Bounded Contexts to evolve their own unique ‘languages’ or ‘dialects’, so it is helpful to keep them in separate glossary files.
The following sections explore how to setup a glossary file from simple to more complex.
A Simple Bounded Context
The top level of the glossary file is a list of bounded contexts. The key in the yml file is contexts. A file with a single context looks like:
contexts: - name: Shipping terms: - name: Order definition: A set of parcels with a common delivery destination. - % other terms %...
The name field of the context is optional, but strongly recommended.
Defining a Domain Vision Statement
domainVisionStatement is an optional field that allows you to express the purpose of the context.
contexts: - name: Shipping domainVisionStatement: To manage the shipping of orders to customers. terms: - name: Order definition: A set of parcels with a common delivery destination. - % other terms %...
Context Metadata
Contexts can have a meta key which allows defining an arbitrary set of key:value pairs. The value must be a string, and they are rendered exactly as supplied with a space between them.
Both the key and the value support markdown, which can allow for hyperlinks out to more thorough documentation, e.g.:
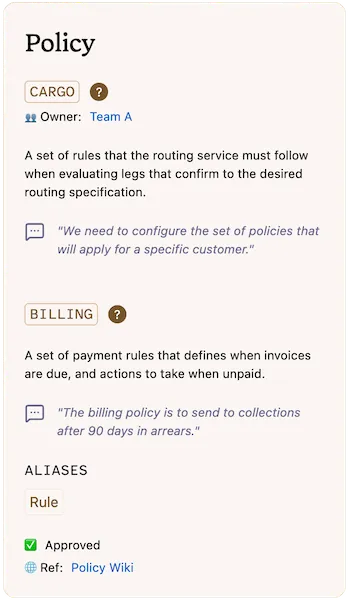
contexts: - name: Shipping domainVisionStatement: To manage the shipping of orders to customers. meta: "👥 Owner:": "[Team A](https://corporate.wiki/teams/TeamA)" "🌐 Ref:": "[Cargo Canonical Reference](https://corporate.wiki/glossary/shipping)" terms: - name: Order definition: A set of parcels with a common delivery destination. - % other terms %...
No Context definition
All three fields - name, domainVisionStatement and meta are optional. If none are undefined, the context can be as simple as:
contexts: - terms: - name: Order definition: A set of parcels with a common delivery destination. - % other terms %...Which would just show the term definition:

See defining terminology for details on defining terms.
Glossary File Template
When getting started, it could be helpful to copy the default glossary file template which contains all possible fields and is used to define the terms used in the glossary file itself.
It can be used as a starting point to edit and amend to incorporate your contexts and define your terms.
Finding Glossary Files
The way Contextive finds your glossary files depends on the working environment:
Development Environments (IDEs)
For Contextive to find a glossary file in development environments, it must match the pattern *.glossary.yml or *.glossary.yaml . You can name the prefix whatever you like, so project.glossary.yml and module.glossary.yaml are both valid filenames, but module-glossary.yml is not.
The following sections explore common patterns for where to place your glossary files.
Terms relevant for the whole repository
If the terms in a file are useful for all files in the repository, then you should put the glossary file in the root.
Directoryrepository
- projectName.glossary.yml <— a glossary for the whole repository
- README.md
Directoryfrontend
Directorycomponents
- SubmitOrder.ts
Directorybackend
Directorydomain
- Order.cs
In the example above, if projectName.glossary.yml contains a definition for the term Order, then that definition will be used when editing README.md, frontend\Components\SubmitOrder.ts and backend\domain\Order.cs.
Different terms relevant in different repositories
This is the same as the previous pattern, but is described to be explicit for teams who are using multiple repositories.
For this approach to work, each repository must deal with different domain concepts so that the terms useful in one repository are irrelevant in the others, and visa versa.
This pattern is particularly useful if each repository contains all the code associated with a Bounded Context.
Directoryshipping-repository
- shipping.glossary.yml <— a glossary only for shipping
Directorysrc
- Order.cs
- …
Directorypayments-repository
- payments.glossary.yml <— a glossary only for payments
Directorysrc
- Order.cs
In this case, shipping.glossary.yml might define Order as A set of parcels with a common delivery destination.. This definition will be shown when working on in the shipping repository.
payments.glossary.yml might define Order as An amount to be charged to the customer and the payment method to charge.. This definition will be shown when working in the payments repository.
Terms relevant only in a subfolder of the repository
If the terms in a file are useful only in a subfolder, put the glossary file in the top-most folder that encompasses those relevant files.
For example, if you are building a ‘modular monolith’ in a monorepo, you might have your modules in separate folders, in which case you should put definitions relevant to each module in that module’s folder, like so:
Directoryrepository
- README.md
Directoryshipping
- shipping.glossary.yml <— a glossary only for shipping
Directorysrc
- Order.cs
Directorypayments
- payments.glossary.yml <— a glossary only for payments
Directorysrc
- Order.cs
Assuming the same definitions as before, where shipping.glossary.yml defines Order as A set of parcels with a common delivery destination. and payments.glossary.yml defines Order as An amount to be charged to the customer and the payment method to charge., then:
- When working on
/shipping/src/Order.cs, hovering over the wordOrderwill showA set of parcels with a common delivery destination. - When working on
/payments/src/Order.cs, hovering over the wordOrderwill showAn amount to be charged to the customer and the payment method to charge.
This pattern is particularly useful if each module in your modular monolith contains all the code associated with a Bounded Context.
Terms defined in an external data source
Some organisations already have their terms defined in an existing dataset and do not want to maintain them separately in a repository.
For this purpose, you can create a glossary that imports from a remote URL. The contents of the remote URL are then treated as though they were available at the position in the folder structure of the importing file.
Directoryrepository
- README.md
Directoryshipping
- shipping.glossary.yml <— will import from a remote URL
Directorysrc
- Order.cs
Directorypayments
- payments.glossary.yml
Directorysrc
- Order.cs
imports: - "https://your.domain/path/to/shipping.glossary.yml"With this configuration, any terminology contained in the file located at https://your.domain/path/to/shipping.glossary.yml will be made available as though it had been defined in shipping/shipping.glossary.yml.
Multiple glossary files may be imported into the same location by defining a list of imports.
imports: - "https://your.domain/path/to/shipping.glossary.yml" - "https://your.domain/path/to/other.glossary.yml"Terms relevant in multiple folder locations
Sometimes even though bounded contexts have different languages and are neatly separated, it’s helpful to have access to terms from another context in some parts of the code - consider code that deals with integration between the contexts.
In this case, the integration folder can contain a glossary file that imports another glossary file from a local absolute or relative path:
Directoryrepository
- README.md
Directoryshipping
- shipping.glossary.yml
Directorysrc
- Order.cs
DirectoryantiCorruptionLayer
- payments-import.glossary.yml <— will import from the payments glossary
- HandleOrderPaymentReceived.cs
Directorypayments
- payments.glossary.yml
Directorysrc
- Order.cs
imports: - "../../../payments/payments.glossary.yml"This will ensure that when working on HandleOrderPaymentReceived.cs all the terms defined in shipping.glossary.yml AND payments.glossary.yml will be available, with clear delineation between contexts, even when the same word has different meanings in each context:

When working on shipping/src/Order.cs, only the definition from shipping.glossary.yml will be shown, and when working on payments/src/Order.cs only the definition from payments.glossary.yml will be shown.
Combining Imports with Terminology
A glossary file can contain a list of imports as well as contexts and terms - they will all be made available when working in the folder, e.g.:
imports: - "../../../payments/payments.glossary.yml" contexts: - name: Shipping Anti-corruption Layer terms: - name: Shipping FeeIn this case the Shipping Fee is a term that is relevant when integrating between payments and shipping, but note that it is part of a separate Context - importing a file does not merge the contexts, rather, it acts as though all contexts were defined in the same file.
Terms relevant across multiple repositories
Some organisations have adopted a distributed repository configuration, where small services (microservices, or cloud FAAS functions) are each located in their own repositories. Often in these cases, the code in these repositories share a domain language.
If you have multiple repositories that would benefit from access to the same terms, then it’s recommended to define the terms in one repository and publish them to a publicly accessibly URL.
You can then use the imports feature in the other repositories and provide the URL that you have publishd your glossary file to.
Multi-root workspaces
Some IDEs (e.g. VsCode) support multi-root workspaces.
Contextive will use glossary files based on their location on disk relative to the files that are being edited and will not consider the multi-root structure.
However, it will only discover glossaries by searching from each of the roots, so depending on the disk layout of the roots, terms may or may not be used across multiple roots.
In this approach, it’s recommended to use something like Terms relevant only in a subfolder of the repository, where each subfolder is ‘root’ in the multi-root workspace.
Multiple Bounded Contexts in a Glossary File
Early versions of Contextive used a single glossary file with all contexts in it, and for backwards compatibility reasons, this is still supported.
To scope the context to a particular portion of the repository, as described in Terms relevant only in a subfolder of the repository, then each context can have a list of path globs supplied and the terms in that context will only be shown for files that match the path glob.
For example, to achieve the same outcome, you could have a structure like:
Directoryrepository
- project.glossary.yml a glossary with all contexts and terms
- README.md
Directoryshipping
Directorysrc
- Order.cs
Directorypayments
Directorysrc
- Order.cs
And the contexts could be defined like so:
contexts: - name: Shipping domainVisionStatement: To manage the shipping of orders to customers. paths: - shipping terms: - % list of terms in the shipping context - name: Payments domainVisionStatement: To manage handling payments, refunds & financial reconciliations for orders. paths: - payments terms: - * list of terms in the payments contextWeb Browsers
Quick Start
To get started quickly and see Contextive in action, follow these steps:
- Install the extension
- Download this demo workspace file
- Open the extension from the icon in the toolbar
- Click
Setup workspaces - Click
Import an existing workspace" - Click
Click to uploadand select theDemo.contextive-workspace.jsonfile you downloaded earlier - Click
Import workspace - Visit the defining terminology to see the terminology from the Cargo domain underlined. Hover over a term and click
View in glossaryto see the side-panel.
Getting started
When you first install the extension and open it from the extension list, the welcome screen offers a few options for getting started:

For self-hosted glossary yml files, click Setup Workspaces
The next screen links you to this guide:
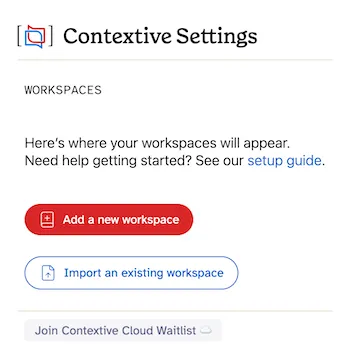
Click Add a new workspace to get started configuring Contextive with your glossary files.
Click Import an existing workspace to get started by uploading a workspace configuration file.
Adding Workspaces
Unlike in code, where it is possible to be confident that a particular file path ‘belongs’ to a given context, in wikis and other documentation, it’s usually the case that content describes things that span across multiple context boundaries.
To that end, workspaces offer a flexible way of bringing together all glossaries, or keeping them separate, as would be helpful.
A workspace is a collection of glossary file URLs, which defines the terminology included in the workspace, and a collection of url match patterns, which define the URLs on which to make the terminology from those glossary files available.
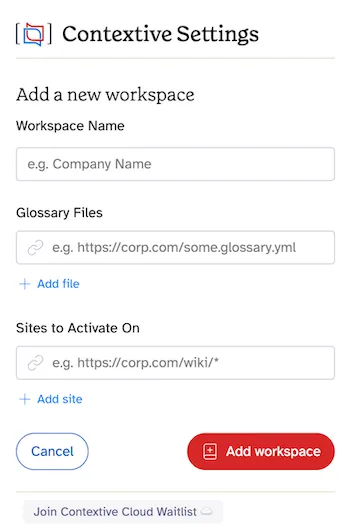
Give your workspace a name (e.g. the name of your company, or team).
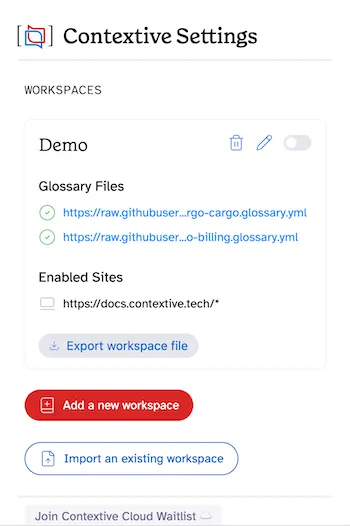
Glossary Files
Enter the URLs at which your glossary files are located.
Click + Add file to add more glossary files into the workspace. The first file cannot be deleted, as there must be at least one glossary file in the workspace.
The Contextive browser extension can only work with glossary files that are hosted at an unauthenticated url.
If your glossary file must be kept private, then you must host it on a private IP address in your private network.
To have all your terminology available all the time, add all of your glossary files here.
Enabled Sites
In the section Enabled Sites, you can enter a set of sites which are URL ‘match patterns’ to define which sites (or paths) to use these glossary files.
URL match patterns are defined by Google, and allow for wildcards for the scheme, domain portions and paths.
For example, if your wiki is at http://wiki.company.com then enter the url match pattern http://wiki.company.com/* to ensure it matches all paths. Without the * wildcard it would only match exactly the default index site.
You can click + Add site to add more url match patterns.
Click Add workspace to add your workspace - the first time you use a given domain in either the glossary URL or the Site to activate on, chrome will prompt you to grant Contextive permission to read your data on those sites.
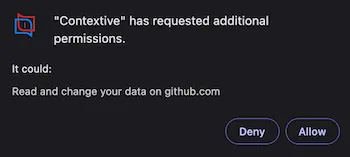
Click Allow or Contextive will not be able to function.
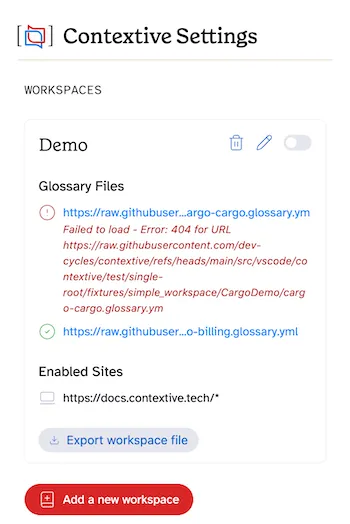
Once the workspace is setup, opening the extension settings will display the workspace details:

Errors loading or parsing glossary files
If there is an error loading or parsing the glossary file, the status indicator will be a red exclamation mark and the error message will be below the glossary file url. In the following example, the url is incorrect and so the file could not be found:
Separating Contexts
To have only terminology from some contexts available at certain sites/paths, ensure each context is defined in a separate glossary file, and then setup a workspace per glossary file.
Setup the Sites to Activate On using url match patterns that align with where each context (or group of contexts) is relevant. It is fine to use the some of the same url match patterns in different workspaces.
Activating and Deactivating a workspace
Once workspaces are setup, Contextive will start highlighting configured terminology on sites that match the url patterns.
You can hover over highlighted terms to see brief definitions, like so:

Click View in glossary to see a detailed definition in a side-panel:
If you’d like to turn off highlighting for a workspace, open the extension and toggle the workspace off:
Currently, each workspace must be activated and deactivated independently.
Checking if Contextive is enabled for a on a iste
For each Enabled Site, there is an icon indicating if the current active tab has Contextive loaded and working. If it is greyed out, then the current tab does not match that site pattern.
When it does match, it will turn green with a tick, like so:

Note: the contextive underline/hover feature may still not be visible if the workspace is deactivated.
Importing / Exporting Workspaces
To share your workspace configuration with your team-mates, you can ‘export’ each workspace to a separate file and distribute those files in the way that makes sense to your team - e.g. via a wiki, or in a git repository.
The workspace configuration should change less often than the glossary files themselves, so re-distribution should not be required too often.
To export a workspace, click “Export workspace file”. A file with the name {workspace name}.contextive-workspace.json will be downloaded from your browser.
To import a workspace, click Import an existing workspace at the bottom of the workspaces list.
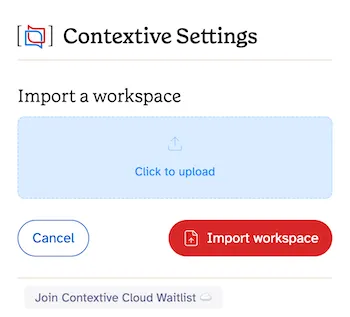
Click on Click to upload and then select the workspace files you would like to import.
Then click Import workspace (or Import workspaces if you uploaded more than one file) and you should see the workspace configurations.
You can download a demo workspace to get started quickly and give Contextive a try. It will activate on this docs site - visit the defining terminology page to see it in action.